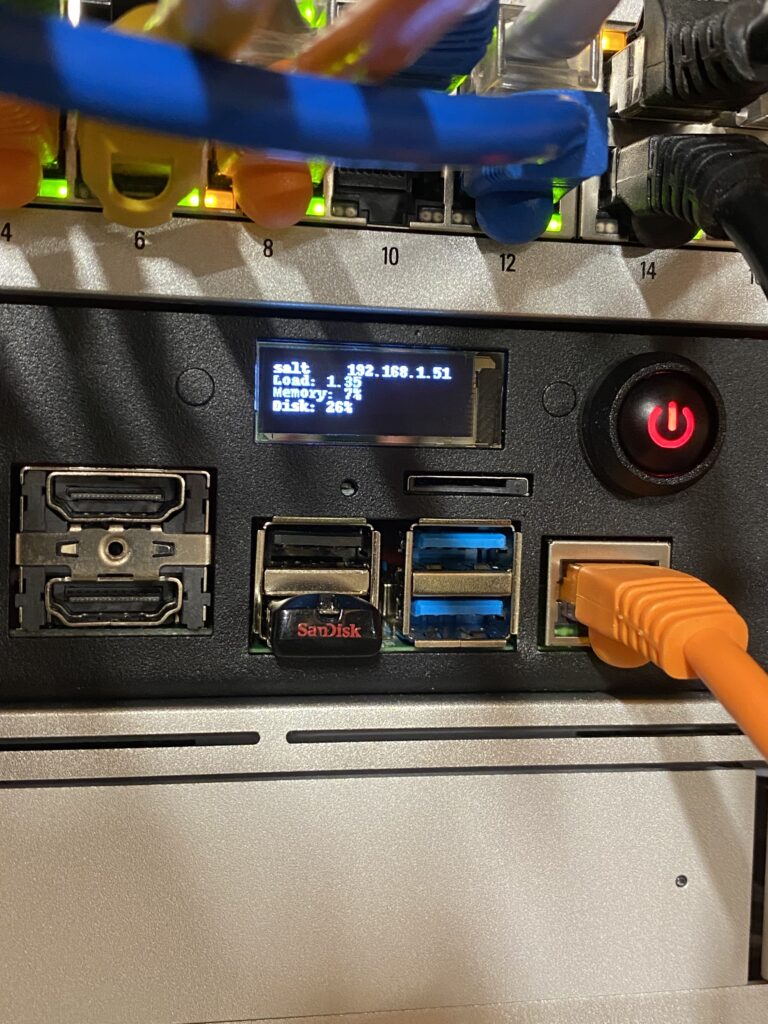
I recently got a UCTRONICS rack for my Raspberry Pi “servers”. One unique feature of the rack is a tiny 0.91″ OLED screen for each Raspberry! OLED? Yeah, OLED. OLED stands for organic light-emitting diode. Each pixel in an OLED display is made of an organic material that glows when you spark it with electricity. This effect is called electroluminescence, “electro” as in electricity, “lumin” for light and “escence” or essence which, according to Oxford means “the intrinsic nature or indispensable quality of something, especially something abstract, that determines its character.” This organic component is what gives the OLED is infinitely adjustable contrast that makes these tiny screens look so good. Adafruit makes a number of various-sized screens that are now widely available.
This kit comes with a downloadable Python3 script that displays the IP address, CPU load, memory usage, and storage space available on the tiny screen. Once you download the screen onto each Raspberry, you can edit it to your heart’s content. The magic is getting the script to run. I do enough Python3 programming to be dangerous and it’s mostly hacking–you know, cutting & pasting google search results into a script and editing it until it quits spitting out errors. That’s how this installation went for me.
Adafruit OLED Screen
The instruction sheet’s last step gives you a git address to get the script from, but that’s about it. The tricky part is navigating Adafruit’s website to find the required modules to get the OLED screen to light up. For some reason, the install order of the modules matters. What quickly becomes evident in the iterative edit/run/edit/run process, is that having installed the Lite version of the OS distro leaves a lot of the prereqs out of your install! The errors let you know. Maybe the process on the instruction sheet is more seamless if you install the FULL version of the OS, but I eventually figured it out.
So, after a frustrating hour, I came up with the following install script. I ran this on each of the Raspberrys to get the screens to light up. I will eventually weave this into a salt script for future use:
sudo apt install -y ttf-mscorefonts-installer python3-pip python3-pil
sudo pip3 install adafruit-blinka
sudo pip3 install adafruit-circuitpython-ssd1306
the first line installs the true type fonts, python3, and the pip3 installer for python3. The next two lines install the required drivers from adafruit. Some of this stuff is proabably in the full Raspberry disto–I’d rather install it myself.
Turning on the Hardware
Before any of this will work, however, you’ll need to activate the I2C and the SPI interfaces on the Raspberry bus. This is done by running
sudo raspi-config
and choosing “Interfaces” and then activating I2C and SPI from the list of choices.
Next, you’ll want to have this run at boot time, so that the little screen will come on when you reboot. The simplest way to do this is to have the rc.local process fire it up. If you haven’t been here before, it’s not hard. Edit the file
/etc/rc.local
and add a line before the “exit” in the last line. I just added, “python3 /root/OLED.py” to mine to literally have the python3 interpreter run the file “OLED.py” from root’s home directory when I stored my completed script. The nice thing about rc.local run the script is that it loads at boot time AND keeps it running in the background.
Of course, I wasn’t satisfied with the stock script, so here’s my updated OLED.py script in /root/OLED.py:
 import math
 import time
 import subprocess
 from PIL import Image, ImageDraw, ImageFont
 from board import SCL, SDA
 import busio
 import adafruit_ssd1306
 i2c = busio.I2C(SCL, SDA)
 disp = adafruit_ssd1306.SSD1306_I2C(128, 32, i2c)
 disp.fill(0)
 disp.show()
 i2c = busio.I2C(SCL, SDA)
 Create blank image for drawing.
 Make sure to create image with mode '1' for 1-bit color.
 width = disp.width
 height = disp.height
 image = Image.new("1", (width, height))
 Get drawing object to draw on image.
 draw = ImageDraw.Draw(image)
 Draw a black filled box to clear the image.
 draw.rectangle((0, 0, width, height), outline=0, fill=0)
 Load default font.
 font = ImageFont.truetype("/usr/share/fonts/truetype/msttcorefont/Georgia.ttf", 20)
 Draw text.
 draw.text((0, 5), "UCTRONICS", font=font, fill=255)
   # Display image.
 disp.image(image)
 disp.show()
 Pause briefly before drawing next frame.
 time.sleep(3)
 font = ImageFont.load_default()
 Draw some shapes.
 First define some constants to allow easy resizing of shapes.
 padding = -2
 top = padding
 bottom = height - padding
 Move left to right keeping track of the current x position for drawing shapes.
 x = 0
 while True:
     # Draw a black filled box to clear the image.
     draw.rectangle((0, 0, width, height), outline=0, fill=0)
     cmd1 = "hostname" cmd2 = "hostname -I | cut -d' ' -f1"
     part1 = subprocess.check_output(cmd1, shell=True).decode("utf-8")
     part2 = subprocess.check_output(cmd2, shell=True).decode("utf-8")
     cmd = "top -bn1 | grep load | awk '{printf \"Load: %.2f\", $(NF-2)}'"
     line2 = subprocess.check_output(cmd, shell=True).decode("utf-8")
     cmd = "free -m | awk 'NR==2{printf \"Memory: %.0f%%\", $3*100/$2}'"
     line3 = subprocess.check_output(cmd, shell=True).decode("utf-8")
     cmd = 'df -h | awk \'$NF=="/"{printf "Disk: %s", $5}\''
     line4 = subprocess.check_output(cmd, shell=True).decode("utf-8")
     # Write four lines of text.
     draw.text((x, top + 0),  part1, font=font, fill=255)
     draw.text((x + 50, top + 0),  part2, font=font, fill=255)
     draw.text((x, top + 8),  line2, font=font, fill=255)
     draw.text((x, top + 16), line3, font=font, fill=255)
     draw.text((x, top + 25), line4, font=font, fill=255)
     # Display image.
     disp.image(image)
     disp.show()
     time.sleep(0.1)
Thank you John.
You guide is the best.
Hi, I’m getting an error with your script – any chance you can help?
File “/home/pi/OLED/OLED.py”, line 43
cmd1 = “hostname” cmd2 = “hostname -I | cut -d’ ‘ -f1”
^
SyntaxError: invalid syntax
Be careful with your cutting and pasting! Your quotes are the wrong kind.
Replace those high ASCII ones with standard ones from your keyboard (next to the Enter key).