Docker? Docker is a software platform that levels the playing field. It creates an autonomous environment for running applications that is completely removed from hardware, operating system, and other software. It removes the guesswork from installing and running applications, because it removes all the variables from the environment. Once you have created your docker environment, you can run anything that’s been containerized for docker. Caveat emptor: we’re doing this on Raspberries so we’ll have to look a little deeper to find containers that have been created on the armhf architecture if we want them to run. So, let’s get docker installed on a couple of Raspberries and then create a little cluster to get them to share resources and create everyone’s favorite platform.
Basic Docker Install
On each of the Raspberries that you’d like to be your docker cluster run the following. We’re going to download a script from docker.com and run it to do an automated install.
curl -curl -sSL https://get.docker.com | sudo sh
Add the pi user to the docker group. This gives pi all the rights and privileges required to run docker without having to rely on the root user.
usermod -aG docker pi
AND you’re done. Good job. End of post. Yeah, but you were hoping for a little more. Reboot and login as pi, then try to use this command to download and run an Ubuntu container. If all goes well, you’ll get an Ubuntu shell prompt.
docker run -it ubuntu bash
YAY! It works. Now, let’s set docker to load at start up:
systemctl enable docker.service
systemctl enable containerd.service
How to Build a Raspberry Cluster with Docker Swarm
OK! We’ve got docker running on our Pis! Next, we need to put them in contact with each other so they can share resources and spread the load. The mechanism to do this is called “swarm”. Basically, what we’re doing is creating a cluster of raspberries. The process is to install swarm on the main node, the manager, and then join the other raspberries running docker to the manager. You’ll need the IP address of your manager for this command. I’m calling my manager docker0. Its address is 192.168.1.20.
root@docker0:~# docker swarm init --advertise-addr 192.168.1.20
 Swarm initialized: current node (iyva9ppktdew1cd3c93uqyyac) is now a manager.
 To add a worker to this swarm, run the following command:
 docker swarm join --token SWMTKN-1-33xq29xnp2v82bcmho2l7ydmva19utqwmz480uc2btslll1ydu-2jn7572sqiunm78j6kci6dq6i 192.168.1.20:2377
 To add a manager to this swarm, run 'docker swarm join-token manager' and follow the instructions.
 root@docker0:~#
The command initializes the swarm, sets up the node as manager, and then spits out the command to run on the rest of the nodes. I’ll just cut&paste that command into the other nodes’ terminals. Then I can check my work with the command:
docker info
Skimming through the info presented, I find:
Swarm: active
   NodeID: iyva9ppktdew1cd3c93uqyyac
   Is Manager: true
   ClusterID: xmfvd797h0fugozm7akhl7zo5
   Managers: 1
   Nodes: 4
… which is what I was expecting. Another way to confirm this is to run:
root@docker0:~# docker node ls
 ID                            HOSTNAME   STATUS    AVAILABILITY   MANAGER STATUS   ENGINE VERSION
 iyva9ppktdew1cd3c93uqyyac *   docker0    Ready     Active         Leader           20.10.7
 jqx28es5dpvjzi6w2rlr7ij04     docker1    Ready     Active                          20.10.7
 0dd61yfp4v4a2h77cbxyhnn7e     docker2    Ready     Active                          20.10.7
 1don1xadv1bqdewwme9menz0c     docker3    Ready     Active                          20.10.7
 root@docker0:~#
Install a Container
Let’s run a container! Keep in mind that we need to look for containers that have been created to run on ARM architecture! I knew about viz and was happy to find that someone had ported it to armhf. Since we’re already trying to visualize our new swarm, let’s run an image provided by @alexellisuk. Cut and paste this into your manager node:
docker service create \
    --name=viz \
    --publish=8080:8080/tcp \
    --constraint=node.role==manager \
    --mount=type=bind,src=/var/run/docker.sock,dst=/var/run/docker.sock \
    alexellis2/visualizer-arm:latest
This command will download, configure, and run your first container. The publish line is the argument that tells docker what port to expose to the network. Fire up your browser, surf to the IP address of your manager:8080:
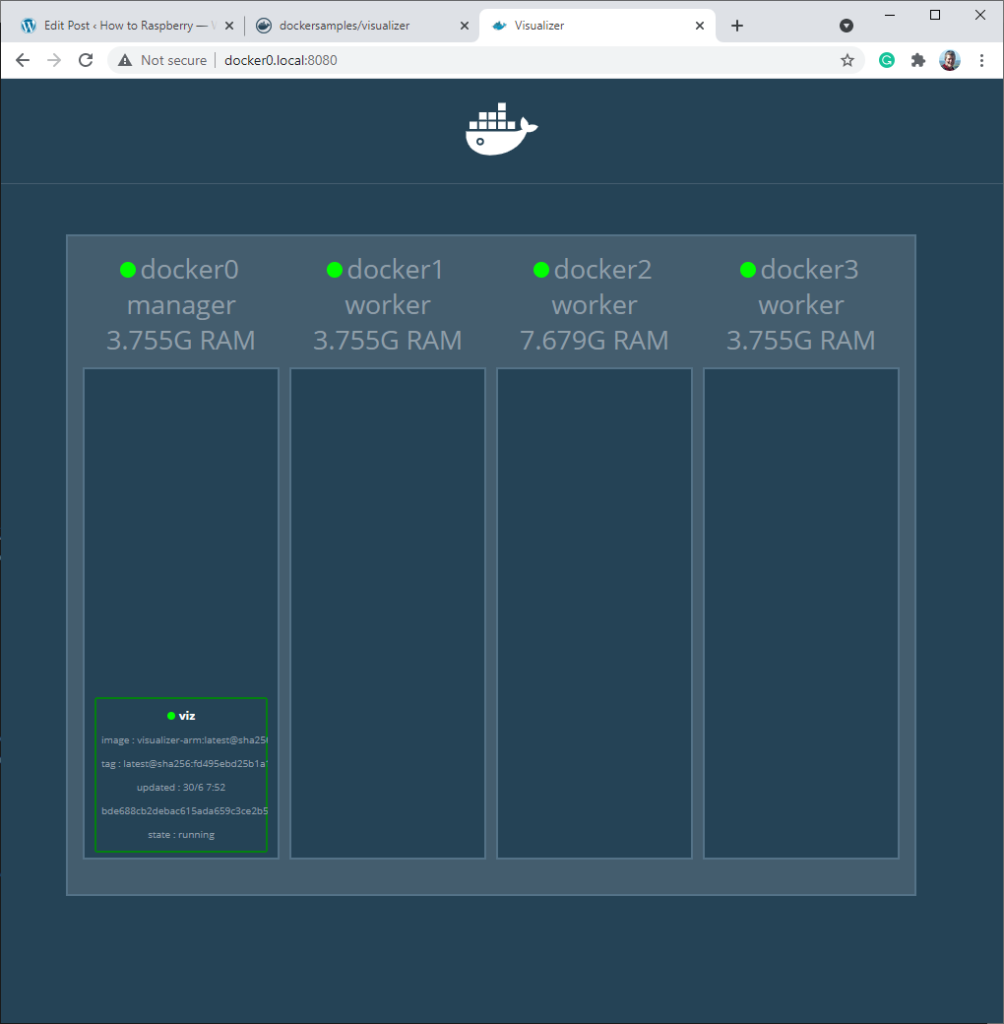
We can see a graphical representation of our swarm! We see the “viz” container in the running state. AND, good news, I finally found my 8GB raspberry! It’s running as docker2!