I’m slowly coming to terms with the Adafruit Libraries and getting Blinka working. This afternoon’s project was to install a ccs811 VOC and CO2 sensor on a Raspberry Pi W. Seems like every time I google how to set up an Adafruit module, I get a mish-mash of old and new pages. Some for python2. Some for python3. Some use deprecated Adafruit stuff. I think I finally got it figured out. You gotta’ do a full buy-in to get Blinka working. With a freshly imaged SD card in a Raspberry Pi W, I ran this set of commands:
How to Install Adafruit Blinka so it actually Works
sudo su -
vi /etc/hostname
reboot
sudo su -
apt update
apt -y upgrade
reboot
sudo su -
apt-get install python3-pip
pip3 install --upgrade setuptools
pip3 install --upgrade adafruit-python-shell
wget https://raw.githubusercontent.com/adafruit/Raspberry-Pi-Installer-Scripts/master/raspi-blinka.py
python3 raspi-blinka.py
reboot
i2cdetect Finds Modules on the I2C Bus
Let’s check to see that the I2C hardware is wired up and talking to the Raspberry. I have a couple of Adafruit modules wired to the I2C bus. I soldered pin headers on them and then put them on a breakout board. The white schmutz is oxidized rosin. This probe sat in a very damp part of the basement for a couple of months.
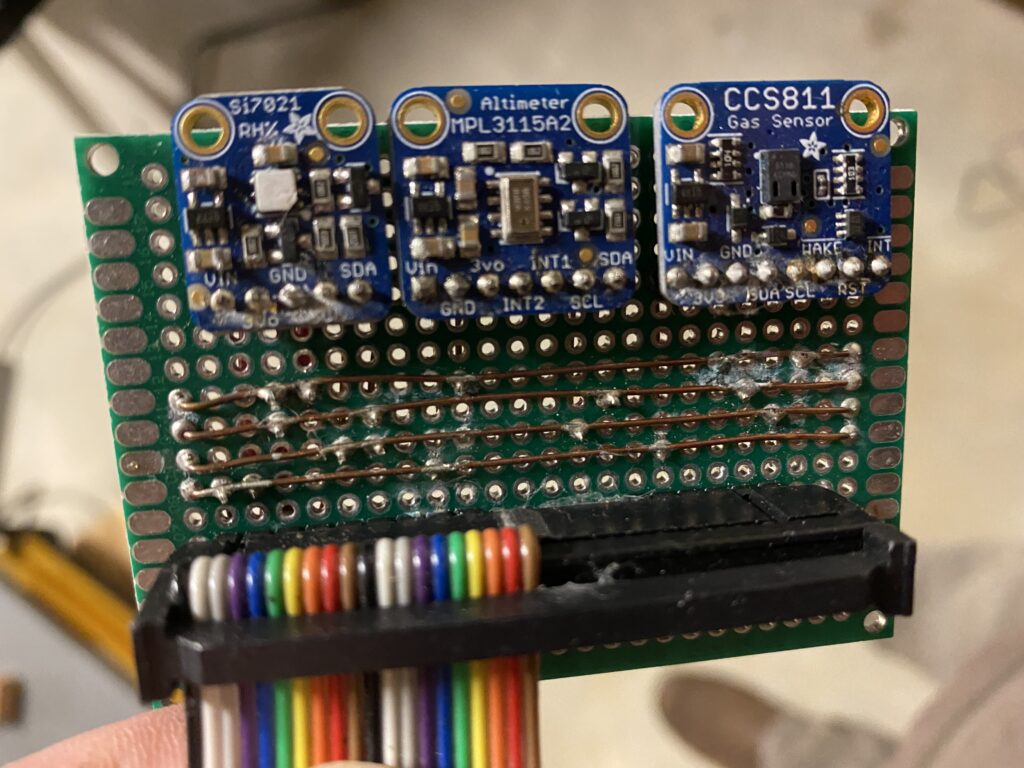
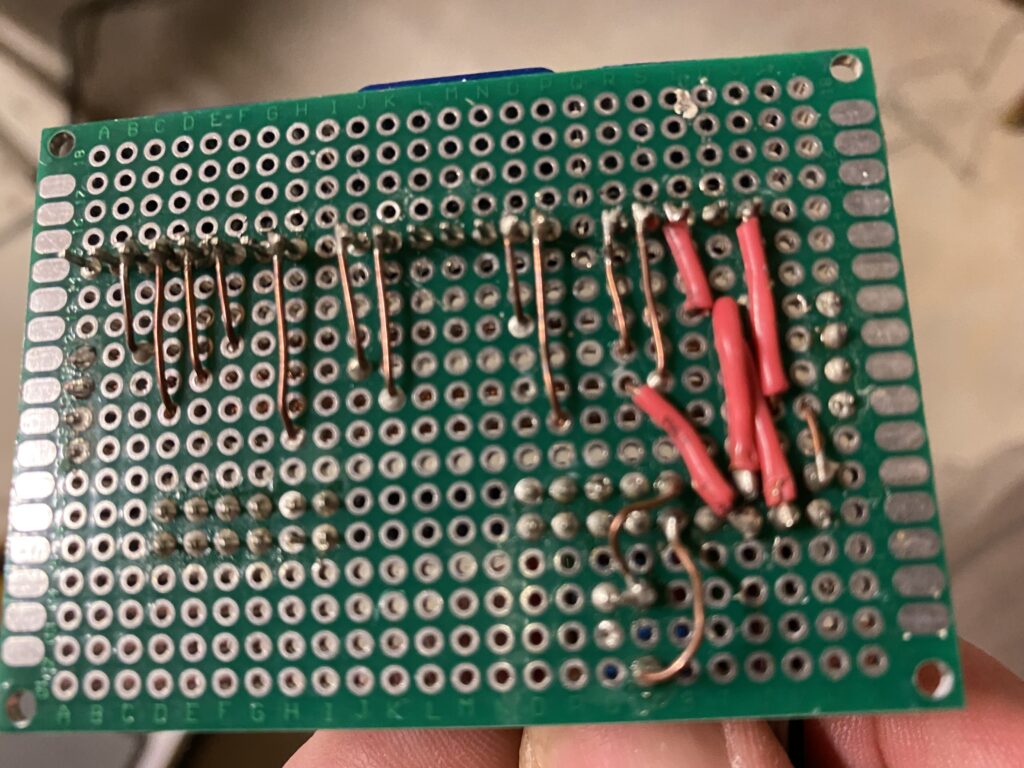
Then a soldered on some bus wires in parallel to join the pins on each module card, which in turn get wired to the header for the ribbon cable that goes to the IO header on the Raspberry Pi. Here’s what the back looks like:
i2cdetect is a great tool to check everything is wired and powered before trying to program anything! Especially with finicky devices like the gas sensor.
pi@basement:~ $ i2cdetect -y 1
     0  1  2  3  4  5  6  7  8  9  a  b  c  d  e  f
00:                         -- -- -- -- -- -- -- --
10: -- -- -- -- -- -- -- -- -- -- -- -- -- -- -- --
20: -- -- -- -- -- -- -- -- -- -- -- -- -- -- -- --
30: -- -- -- -- -- -- -- -- -- -- -- -- -- -- -- --
40: 40 -- -- -- -- -- -- -- -- -- -- -- -- -- -- --
50: -- -- -- -- -- -- -- -- -- -- 5a -- -- -- -- --
60: 60 -- -- -- -- -- -- -- -- -- -- -- -- -- -- --
70: -- -- -- -- -- -- -- --
pi@basement:~ $
Hmm. 3 devices! Let’s check “the list“. Yup. A CCS811 VOC sensor (0x5A), Si7021 Humidity/Temp sensor (0x40), and MPL115A2 Barometric Pressure (0x60).
Example Python3 Script to poll the ccs811
I found a python3 script to query the ccs811 (on the Adafruit website):
import time
import board
import adafruit_ccs811

i2c = board.I2C()
ccs811 = adafruit_ccs811.CCS811(i2c)

# Wait for the sensor to be ready
while not ccs811.data_ready:
    pass

while True:
    print("CO2: {} PPM, TVOC: {} PPB".format(ccs811.eco2, ccs811.tvoc))
    time.sleep(0.5)
When I run it, I kept getting errors, like:
OSError: [Errno 121] Remote I/O error
RuntimeError: Device ID returned is not correct! Please check your wiring.
or some comment about “try reapplying power to the device”. Ugh! What?
Clock Stretching for Adafruit Modules
Back to the old drawing board! I did a little reading about clock stretching I2C devices and how you need to slow the I2C bus timing down so that the devices have time to answer the queries from the python program. To get the ccs811 to communicate with the Pi, make this change in your /boot/config.txt file:
dtparam=i2c_arm=on,i2c_arm_baudrate=40000
#dtparam=i2c_arm=on
Save the file and reboot! Run the program again and you’ll get results!
CO2: 0 PPM, TVOC: 0 PPB
CO2: 0 PPM, TVOC: 0 PPB
CO2: 0 PPM, TVOC: 0 PPB
CO2: 0 PPM, TVOC: 0 PPB
CO2: 0 PPM, TVOC: 0 PPB
CO2: 400 PPM, TVOC: 0 PPB
CO2: 400 PPM, TVOC: 0 PPB
CO2: 400 PPM, TVOC: 0 PPB
The sensor takes a little time to warm up. Let it run for 15-20 minutes and you’ll start getting real results:
CO2: 403 PPM, TVOC: 0 PPB
CO2: 403 PPM, TVOC: 0 PPB
CO2: 403 PPM, TVOC: 0 PPB
CO2: 403 PPM, TVOC: 0 PPB
CO2: 407 PPM, TVOC: 1 PPB
CO2: 407 PPM, TVOC: 1 PPB
CO2: 400 PPM, TVOC: 0 PPB
CO2: 400 PPM, TVOC: 0 PPB
CO2: 407 PPM, TVOC: 1 PPB
CO2: 407 PPM, TVOC: 1 PPB
CO2: 407 PPM, TVOC: 1 PPB
And if I blow across the top of a bottle of Ethyl Acetate, toward the sensor, I can affect change:
CO2: 427 PPM, TVOC: 4 PPB
CO2: 427 PPM, TVOC: 4 PPB
CO2: 427 PPM, TVOC: 4 PPB
CO2: 427 PPM, TVOC: 4 PPB
CO2: 427 PPM, TVOC: 4 PPB
CO2: 427 PPM, TVOC: 4 PPB
CO2: 427 PPM, TVOC: 4 PPB
CO2: 427 PPM, TVOC: 4 PPB
CO2: 424 PPM, TVOC: 3 PPB
Now, let’s see if we can get the rest of the sensors working!
A Final Note About Using the ccs811
Poll this thing every second to keep it heated up. Save the readings every 5 minutes or whatever works for your application, but you HAVE to continuously poll this thing to keep it up to temp and giving accurate results.