When you have a lot of devices on your network and you need to make sure that they’re performing to their best ability. Assume that everything is running but put some monitoring in place to ensure it! Cacti does a fabulous job of watching everything that you throw at it AND graphs out all of the values every 5 minutes.
Another great feature of cacti is its support. There are so many people running cacti that if you have something that you need to monitor, somebody has probably already written a plugin to support it! Awesome!
Pre-Install Steps
To make a cacti raspberry, start in the usual fashion: format an SD card with your favorite Raspberry OS (and remember to create the /boot/ssh file). Boot it up, change the passwords and timezone, set the date, and run “apt update” and “apt upgrade”. I do all of this through my saltstack management software.
cacti Installation
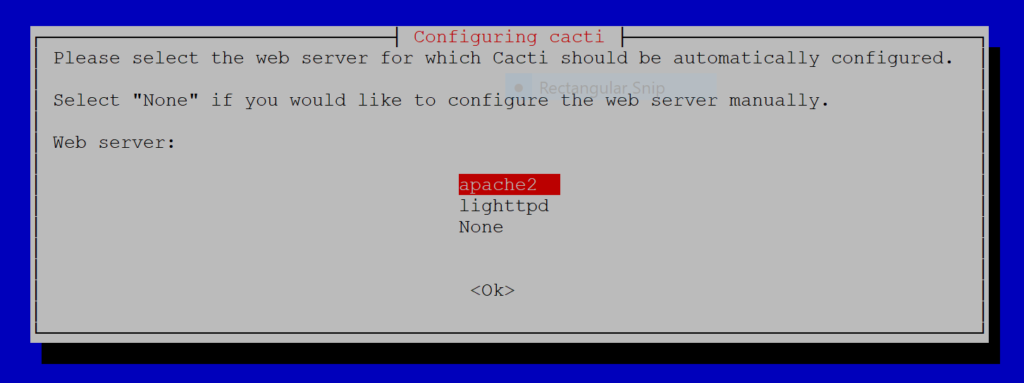
Another bonus: cacti is available in the repos! So, just run “apt install cacti” while logged in as root. apt will download quite a few prerequisites–Thank God for apt! Answer “y” when prompted and apt will install things for a while. When it finally comes to rest, the first question that it has is regarding what web server you want to install. I’m choosing apache2 because I’m more familiar with that one. You can arrow down to lighttpd and use that. It’s less resource-intensive than apache2, so is probably better suited to running on a raspberry pi.
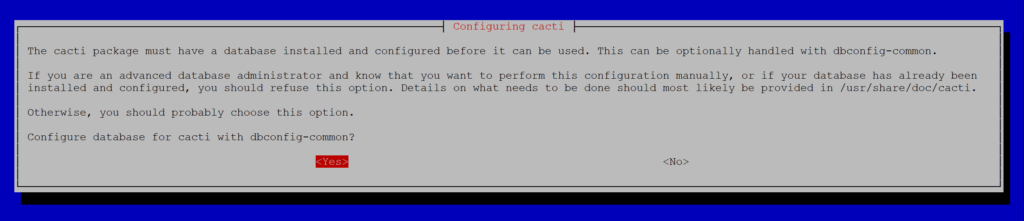
Next, the cacti install will want to know about the database in which you intend to store the piles of data that cacti collects every 5 minutes. If you have an external database server to use, choose “no” here. Otherwise, answer “yes” and the installer will install a small local database and configure cacti to use it. There’s some notes, below, on how to configure your existing server to be used by cacti.
A Couple of Quick Checks
The installer should finish up and unceremoniously drop you back at the command prompt. At this point, I like to reboot and see where we are. Once the Raspberry finishes rebooting, try to reach it on your web browser. You should get the apache default screen:
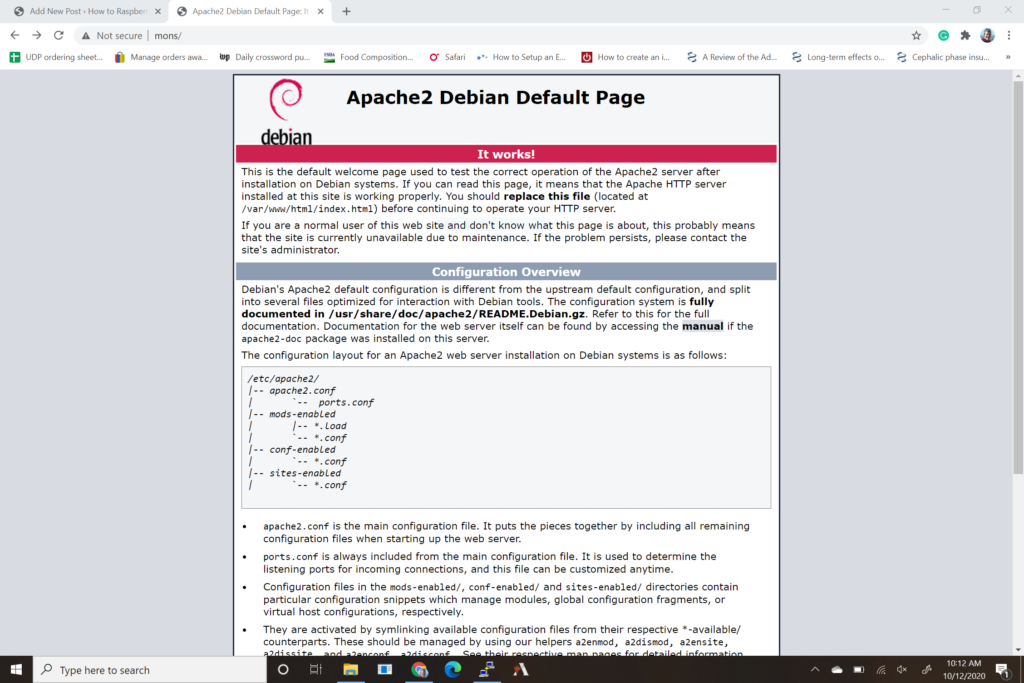
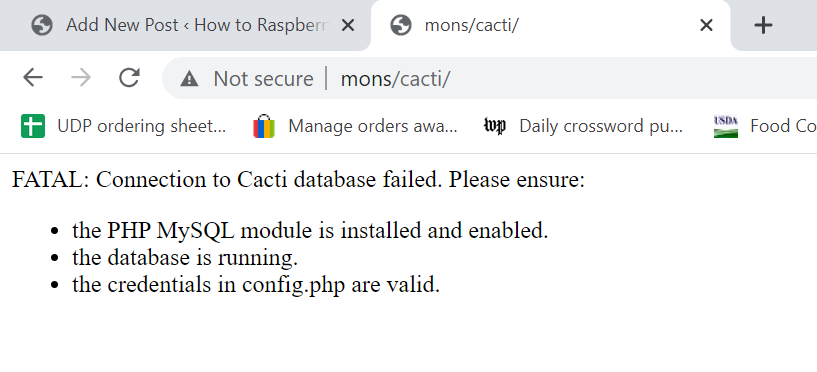
Good job! It’s a web server. Take note of the grey block in the middle of the page. It outlines how the available/enabled file structure is set up in the new apache version. We’ll get to that in a minute. Don’t worry–cacti is running, but the default security doesn’t allow access to the cacti page. If you try, you’ll get an error:
Don’t despair! We’re making progress. Just for fun, let’s take a look at netstat to see what we ARE serving:
root@mons:~# netstat -avpnt
Active Internet connections (servers and established)
Proto Recv-Q Send-Q Local Address Foreign Address State PID/Program name
tcp 0 0 127.0.0.1:3306 0.0.0.0:* LISTEN 600/mysqld
tcp 0 0 0.0.0.0:80 0.0.0.0:* LISTEN 602/apache2
tcp 0 0 0.0.0.0:22 0.0.0.0:* LISTEN 556/sshd
root@mons:~#
This list shows for what incoming connections the server is currently listening. Port 3306 is the database. Port 80 is our newly established web server. 22 allows us to ssh in. OK, let’s get cacti on line.
The installer good, but not perfect. Let’s install a couple more little bits:
apt install librrds-perl libzip4 php php-json php-zip php7.3 php7.3-zip
Configure the Database
For those of you that selected “no” on the configure database question above, we’re going to have to configure the database to accept connections from the cacti process. If you answered “yes, skip down to the Configure Web Server section.
We just installed MySQL on our raspberry. Log in and configure it. There’s no password because the database is only listening on the localhost IP address (see the netstat results, above), so just hit enter.
[root@mons ~]# mysql -u root -p
Enter password:
Welcome to the MariaDB monitor. Commands end with ; or \g.
Your MariaDB connection id is 8432
Server version: 5.5.64-MariaDB MariaDB Server
Copyright (c) 2000, 2018, Oracle, MariaDB Corporation Ab and others.
Type 'help;' or '\h' for help. Type '\c' to clear the current input statement.
MariaDB [(none)]> create database cacti;
Query OK, 1 row affected (0.00 sec)
MariaDB [(none)]> grant all privileges on cacti.* to cactiuser@'locahost' identified by 'cactipass';
Query OK, 0 rows affected (0.04 sec)
MariaDB [(none)]> flush privileges;
Query OK, 0 rows affected (0.00 sec)
MariaDB [(none)]>exit
Bye
[root@mons ~]#
Configure Cacti Credentials
With the DB ready for cacti to attach, configure cacti’s database credentials. Those settings are in /usr/share/cacti/site/include/config.php. Edit that file to match the values you put in when setting up MySQL. NOTE: there are two sections that look similar in this file. Edit the first one.
$database_type = 'mysql';
$database_default = 'cacti';
$database_hostname = 'localhost';
$database_username = 'cactiuser';
$database_password = 'cactipass';
$database_port = '3306';
$database_ssl = false;
$database_ssl_key = '';
$database_ssl_cert = '';
$database_ssl_ca = '';
Configure the Web Server
You may need to turn on PHP functionality on our new web server. If you’re not sure if your web server is PHP enabled, there’s a simple test. Create a text file in /var/www/html/info.php that looks like this:
<?php
   phpinfo();
?>
and then browse to http://your raspberry’s ip address/info.php If you see a long screen with all sorts of information about your server, php is enabled. IF your browser tries to download the file, you need to enable php. Apache2 makes this easy. The PHP module is waiting for you in /etc/apache2/mods-available. Just create a couple of sym(bolic) links to the parallel directory mods-enabled:
root@mons:/# cd /etc/apache2/mods-enabled
root@mons:/etc/apache2/mods-enabled# ln -s ../mods-available/php7.3.conf php7.3.conf
root@mons:/etc/apache2/mods-enabled# ln -s ../mods-available/php7.3.load php7.3.load
root@mons:/etc/apache2/mods-available#
PHP support will be available after the next time we restart apache. IF you’re still downloading PHP files, check that the PHP module is installed in your server. If you’re still having trouble, try a different browser or clear your cache.
Security Settings for cacti
We also need to edit the security settings so we can actually get to cacti with our browser. Put this little bit in /etc/apache2/sites-enabled/cacti.conf:
Alias /cacti /usr/share/cacti/site
   <Directory /usr/share/cacti/site>
   <IfModule mod_authz_core.c>
      # httpd 2.4
      Require all granted
   </IfModule>
</Directory>
OK! Restart apache2 one last time with:
systemctl restart apache2
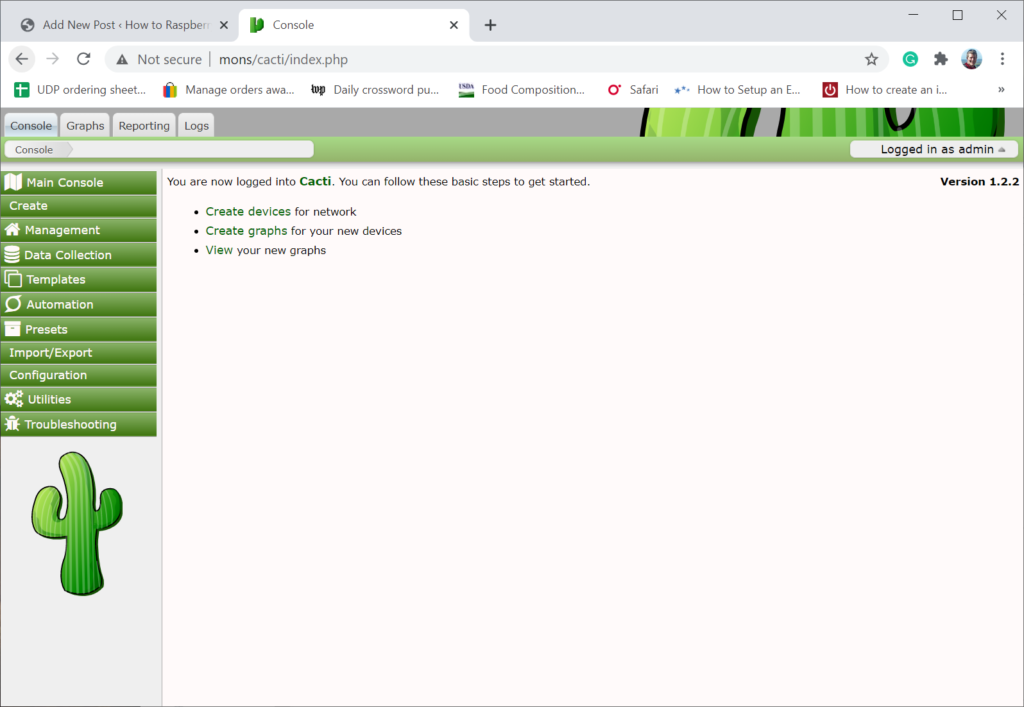
…and hit cacti with your browser! The URL is http://raspi IP address/cacti and you should arrive at the pretty green login screen. The default credentials are admin/admin, but on Debian, it’s admin/whatever you typed in for the database password
From here, you need to start adding devices for cacti to monitor! Awesome! I’ll cover that in the next post! See you soon!
Thanks for your very clear explanation. This was very helpful for me.
Only one very smal remark.
The PHP test file should end with “?>” instead of “/php>” and then everything is working as you explained.
fixed!
Thanks for the note!
Thanks. Very helpful getting Cacti up and running.
Thanks for the tutorial. However the “info.php” file seems wrong. Instead of the “/” at the end, make that a “?”.
It should read:
Good catch!!
I fixed the page.
Thanks for your help. 🙂
In the Configure the Database section, it asks for the password for the root user.
Earlier in the setup, I was prompted to create a password. So when it came time, I tried two accounts and three passwords:
pi and root
the password I created earlier, blank password and raspberry (default/current password for the pi account). None of the combinations were accepted. Any thoughts?
Thank you.
That’s the mysql root user, not the operating system’s root user. So, the password was set when you installed mysql.
Doesn’t seem to work on a Pi4 running bullseye, I get this when attempting to install:
The following packages have unmet dependencies:
cacti : Depends: php-snmp
E: Unable to correct problems, you have held broken packages.
(I am not an expert)
Yes, it does. I just followed the steps on a fresh install of bullseye. Something else is wrong. Looks like you might not have finished another installation or you weren’t root. cacti is a completely automated installation. You’d probably be best to start with a fresh install of bullseye, and try again.
I can install this just fine, I followed your guide perfectly and didn’t change anything, I’m SSHd into my raspberry pi from my computer, I can hit the GUI of Cacti but I can’t login because I get invalid password or username, I’ve tried everything I can think of. In mysql if I run the “SHOW FULL TABLES CACTI” it returns “Empty set”. Can anyone help please?
Double-check your steps in “Security Settings for cacti” and then restart apache or reboot.
Well for some reason the third fresh install let me login, great tutorial!
Nice!
Thank you!
Do you think is it also possible to have cacti on raspberry with docker?
Thanks again =)