I’ve got a couple of LINUX servers and a Synology NAS on my CyberPower 1350 UPS. I’d like to monitor the battery level and OUTAGES. I can use the little pushbutton on the front to poke through the status OR I can install NUT and monitor my UPS with a cool webpage and much better statistics! I’m going the webpage route!
Setting up NUT on Raspberry
Image an SD card and do the usual setup steps. Check my GUIDE if you have questions. I changed the hostname to “ups” to identify my new server. Plug a USB cable into the UPS and into the Raspberry. Check your connection with “lsusb”, literally “list USB devices”:
pi@ups:~ $ lsusb
Bus 001 Device 004: ID 0764:0501 Cyber Power System, Inc. CP1500 AVR UPS
Bus 001 Device 003: ID 0424:ec00 Standard Microsystems Corp. SMSC9512/9514 Fast Ethernet Adapter
Bus 001 Device 002: ID 0424:9514 Standard Microsystems Corp. SMC9514 Hub
Bus 001 Device 001: ID 1d6b:0002 Linux Foundation 2.0 root hub
pi@ups:~ $
Looks good. I see my UPS at the top of the list. Now install the monitoring software:
apt-get update && apt-get install nut nut-client nut-server
This is the Network UPS Tools package or “NUT” for short. Nice to have real-world tools in the Raspberry repositories for easy installs! w00t!
NUT Configuration
First, let’s add the connection and the UPS to the config in /etc/nut/ups.conf. I like to add my stuff right at the bottom so I can find it quickly in the future. Add the following “stanza”:
[servers]
driver = usbhid-ups
port = auto
desc = "CyberPower CP1350 AVR UPS"
Hopefully, YOUR UPS is like mine and works well with the usbhid-ups driver. The name can be whatever suits your fancy. Put it in [square] brackets. The desc(ription) is also completely up to you. I would say, try the auto settings–otherwise, you can look up your model here.
Next, we need to set up upsmon.conf Again, I’m just going to add what I need to the end of the file. The first line shows the format. You can include it as a comment for future reference. :
# MONITOR <system> <powervalue> <user> <password> ("master"|"slave")
MONITOR servers@localhost 1 monuser secret master
The system is the name that we configured in the [servers] part of ups.conf. Powervalue of 1 is fine for home use. Username and password are at your discretion. (Mine are based on the hardcoded credentials that a Synology NAS uses.) “master” because the UPS is attached directly to this device through the USB cable. The clients will be defined as “slave”.
This same “user” is then added to /etc/nut/upsd.users. At the very bottom of the file, add:
[monuser]
   password = secret
   upsmon master
Finally, set the mode of how this whole thing will function. Edit /etc/nut/nut.conf and change the last line:
MODE=netserver
The Big Restart
Now, let’s restart these processes and see if we can connect. I’m going to just reboot. That will ensure that all the config files got saved and the unit files are all enabled. Once the Raspberry comes back up, try to connect with UPSC and the name of your UPS:
root@ups:~# upsc servers@localhost
Init SSL without certificate database
battery.charge: 53
battery.charge.low: 10
battery.charge.warning: 20
battery.mfr.date: CPS
battery.runtime: 490
battery.runtime.low: 300
battery.type: PbAcid
battery.voltage: 13.7
battery.voltage.nominal: 12
device.mfr: CPS
device.model: CP 1350C
device.type: ups
driver.name: usbhid-ups
driver.parameter.pollfreq: 30
driver.parameter.pollinterval: 2
driver.parameter.port: auto
driver.parameter.synchronous: no
driver.version: 2.7.4
driver.version.data: CyberPower HID 0.4
driver.version.internal: 0.41
input.transfer.high: 140
input.transfer.low: 90
input.voltage: 123.0
input.voltage.nominal: 120
output.voltage: 123.0
ups.beeper.status: enabled
ups.delay.shutdown: 20
ups.delay.start: 30
ups.load: 33
ups.mfr: CPS
ups.model: CP 1350C
ups.productid: 0501
ups.realpower.nominal: 298
ups.status: OL CHRG
ups.test.result: Done and warning
ups.timer.shutdown: -60
ups.timer.start: 0
ups.vendorid: 0764
root@ups:~#
UPS Web Server
YAY! It works! Now, to install the web component, as promised! First, install the webserver and the NUT web stuff:
apt install apache2 nut-cgi
Edit /etc/nut/hosts.conf to allow CGI scrips access to the monitor. Add one line to the bottom of the file:
MONITOR servers@localhost "Server UPS"
Enable CGI in apache and restart the web server:
root@ups:/etc/nut# a2enmod cgi
Your MPM seems to be threaded. Selecting cgid instead of cgi.
Enabling module cgid.
To activate the new configuration, you need to run:
systemctl restart apache2
root@ups:/etc/nut# systemctl restart apache2
root@ups:/etc/nut#
Now, you just need to convince apache that you really, really want to turn on CGI by uncommenting the following in /etc/nut/upsset.conf:
### I_HAVE_SECURED_MY_CGI_DIRECTORY
…and you should be able to hit the webpage:
http://ups.local/cgi-bin/nut/upsset.cgi
Do you remember the username and password that we configured for upsmon? You’re going to need it here! Once you’re logged in, you can take a look at your status, or actually issue commands to the UPS! (No wonder it’s password protected!) Another page that comes with the package is here:
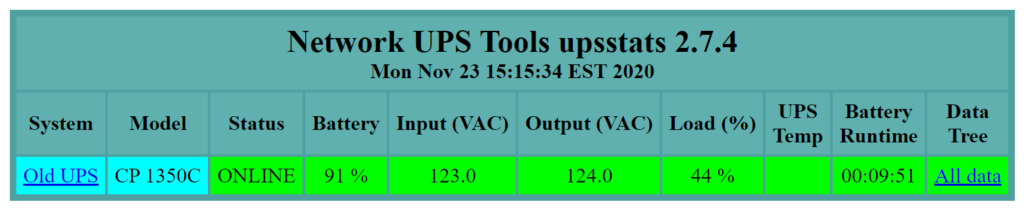
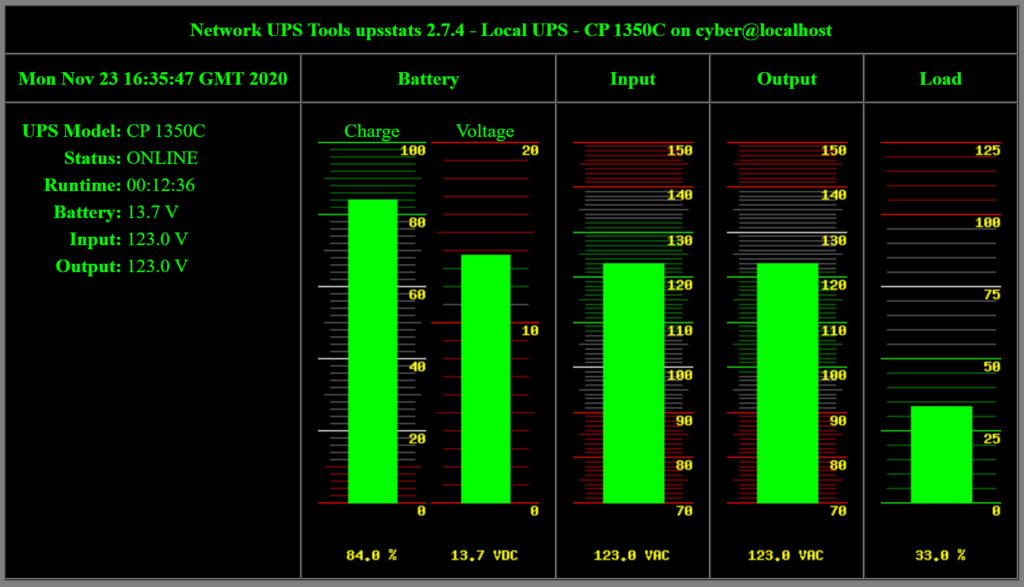
http://ups.local/cgi-bin/nut/upsstats.cgi
Next post, we look at configuring the client or “slave” systems. This allows the upsmon process to send shutdown commands to the servers that are plugged into this UPS and do an orderly shutdown instead of crashing when the lights go out!
Thanks. Works like a charm. Never realised my Eaton 3S 850 UPS was able to share this much data. Any idea if this data can be shared with InfluxDB / Grafana? When possible, what would be the route in general?
To visualise the data with Grafana you also need to store the data in Prometheus. To bridge one, or many, NUT or APC apcupsd clients to Prometheus you can use https://hub.docker.com/r/kronos443/nutcase Which also allows you to display the status info of the UPS on the dashboard app HomePage (GitHub gethomepage). The NUTCase Wiki has some guidance on setting up with Grafana.
How would you monitor two UPSes, on different USB ports on the same Raspberry Pi? I can monitor one UPS, but not the other. Both are Tripplite SmartUPS Pro boxes.
Just add a second line to each of the config files for that second UPS:
hosts.conf:MONITOR ups@localhost “Downstairs UPS”
hosts.conf:MONITOR 2Dups@localhost “Upstairs UPS
upsmon.conf:MONITOR ups@localhost 1 monuser secret master
upsmon.conf:MONITOR 2Dups@localhost monuser secret master
Is there a way to monitor multiple pi Ws on different UPSs within the Wi-Fi network?
in the /etc/nut/ups.conf file I had to add the UPS “serial” number to keep the 2 identical UPS as I wanted:
[wffstudyups1]
driver = usbhid-ups
port = auto
serial = “CXEHX2000942”
desc = “Wolfforth Study UPS1”
[wffstudyups2]
driver = usbhid-ups
port = auto
serial = “CTHKY2014041”
desc = “Wolfforth Study UPS2”
Hi John,
Where’s that 2nd article, in which you share that info with your servers for an orderly shutdown? That is precisely the problem that led me to find your article. 2 Servers plugged into the same UPS which only has 1 USB cable out. I have several Rpi’s laying about doing nothing, and this sounds like an elegant and useful purpose for one of them!
Best Regards,
Robert
Yeah, I need to address how to config the servers as clients of NUT!
Stay tuned.
I finally figured it out: https://www.howtoraspberry.com/2021/05/how-to-configure-an-orderly-shutdown/
Thanks so much for this great article. How could you make it send an email if it went from mains to battery power?
Just add an email command in upssched. Here’s the article: https://www.howtoraspberry.com/2021/05/how-to-configure-an-orderly-shutdown/
It’s finally online: https://www.howtoraspberry.com/2021/05/how-to-configure-an-orderly-shutdown/
I noticed the power adapter that came with the Pi Zero Vilros case is labeled for 2.5A output, while the USB charger ports on the CyberPower UPS are labeled for 2.4A output.
Disregard this comment. I easily determined that the USB ports are battery supported and work fine to power the Pi.
I would like to offer a few tips to this excellent blog post…
Consider telling users:
When NUT installs itself, it sometimes fails to give group read access perms to the NUT services to the config folder. In the /etc/nut folder, enter the cmd: chmod 644 *
And, the following was important for me to get the companion iPhone app working, UPS Power Monitor (by Dariusz Niklewicz https://apps.apple.com/us/app/ups-power-monitor/id1500563567)…
NUT is picky about your needing to specify ALL of the interfaces it needs to listen on, the default local interfaces config doesn’t cut it for some client apps. So, in /etc/nut/upsd.conf file, add the following:
LISTEN 127.0.0.1 3493
LISTEN ::1 3493
LISTEN ups 3493 # locally resolved ip
LISTEN ups.local 3493 # externally resolved IP
I did end up having to do the following adjustments for my CyberPower UPS. …might be worth mentioning? …especially if users experience the ‘Stale Data’ ups connection error.
https://raspberrypi.stackexchange.com/posts/72926/revisions
Yeah, definitely worth a mention if people have trouble. Thanks, David!
Hello, great article.
When I browse to upsset.cgi and issue a command eg. Start Quick Battery Test, I get an error saying ‘ERR ACCESS-DENIED’.
Is there something I’ve missed?
Double-check your username and password setup in ‘upsd.users’.
Thanks for the guide. Everything is working fine until the webpage, under UPS Web Server. I’m trying to navigate to https://ups.local/cgi-bin/nut/upsset.cgi, but it doesn’t load. “Site can’t be reached.”
Not getting past the second step due to NUT failing with
Fatal error: unstable configuration
Driver failed to start (exit status=1)
Network UPS Tools – Generic contact-closure UPS driver 1.36 (2.7.4)
UPS type: APC Back-UPS (940-0020B/C cable)
unable to open auto: No such file or directory
Btw, I wanted my Pi Zeros to simply text me with state changes of my NUT monitored UPSs but, I found setting up mail and forwarding through a service kind of unwieldly. So, I just subscribed to textbelt.com for ~ $10 per yr for a lot of msgs, and it just takes a simple curl command. 🙂 I.e:
/bin/upssched-cmd
DATUM=`/bin/date`
UPSHOST=`/bin/hostname`
PHONE=”[phone #]”
TEXTBELT='[textbelt.com key]’
…
onbatterypower)
logger -t upssched-cmd “UPS went on battery power at this time”
MSG=$(echo “$DATUM:\nUPS [$UPSHOST] is using BATTERY !!”)
curl -X POST https://textbelt.com/text \
–data-urlencode phone=”$PHONE” \
–data-urlencode message=”$MSG” \
-d key=$TEXTBELT
;;
…
backonlinepower)
logger -t upssched-cmd “UPS reports power is back”
…
David, I see this post is very old. I was trying to replicate your textbelt.com process. I can get it to work from a Terminal Screen. However, the CURL within UPSSCHED.CONF does not work. Any ideas?
I have two identical APC XS1500 power supplies usb connected to my pi-4. I have the most current version of nut server/client installed and separate configuration entries for each UPS in ups.conf and upsmon.conf. When I run upsc apc1500-1 or apc1500-2 I get the output from the SAME UPS every time. I also see these messages on syslog. Any ideas how to uniquely identify each ups in the config?
Sep 21 18:25:32 upspi1 usbhid-ups[991]: libusb_get_interrupt: error submitting URB: Device or resource busy
Sep 21 18:25:32 upspi1 usbhid-ups[991]: Got disconnected by another driver: Device or resource busy
Sep 21 18:25:32 upspi1 kernel: [ 1416.663512] usb 1-1.3: usbfs: process 991 (usbhid-ups) did not claim interface 0 before use
I’ve never run into that. Maybe a solution can be gleaned from here: https://serverfault.com/questions/994338/how-can-i-fix-my-ups-repeatedly-disconnecting-and-reconnecting
followed this walk through twice can’t get the web site
A lot of people miss this:
Now, you just need to convince apache that you really, really want to turn on CGI by uncommenting the following in /etc/nut/upsset.conf:
### I_HAVE_SECURED_MY_CGI_DIRECTORY
Can you at least get to the Apache test page?
Great site. I’ve got the NUTs running and I love it. Is there an easy way to log the UPS input voltage. I’m trying to keep an eye out for input voltage problems from our electric supplier.
Thanks again
You could set up a cron job to run every 10 minutes or so:
upsc servers@localhost | grep input.voltage >> voltage.log
Wow, it works like a charm (apart from the name of the server to me is localhost) all is fine.
Missing autorefresh, tough. Thank you for the help!
PS. This works MUCH better than upsmon.
Your setup works perfectly. I would like to try and monitor my UPS from remote sites. Currenty on any of my local computers I use “ups.local/cgi-bin/nut/upsstats.cgi”.
I have a DDNS setup to get back to my home router. How can I do this ?
Thanks
Steve
Set up a port forwarder on your router. Say any traffic to port 8888 gets port forwarded to:80. Then you can go to the URL HTTP://:8888 and you’ll hit the ups CGI-web site.
Do NOT NOT NOT do port forwarding to this page. Did you read /etc/nut/upsset.conf?
Exposing the cgi files to the Internet is just inviting someone to start pounding your Pi attempting to crack the passwords. This application is not secured to be internet-facing and has zero brute-force prevention.
If someone wants to access remotely, they should setup a VPN like OpenVPN or WireGuard to get back into their network.
While I don’t use the web interface, but I am a bit lost since it used to work, and maybe you know the answer.
If I run ‘sudo upsc [email protected]′ I get a reply.
If I run with network cards IP address I get an error’ sudo upsc [email protected]′
Error: Connection failure: Connection refused
‘ip a’ gives me:
2: eth0: mtu 1500 qdisc pfifo_fast state UP group default qlen 1000
link/ether b8:27:eb:53:ec:6d brd ff:ff:ff:ff:ff:ff
inet 10.0.0.2/24 brd 10.0.0.255 scope global dynamic noprefixroute eth0
valid_lft 84863sec preferred_lft 74063sec
inet6 fe80::5182:8699:11af:d390/64 scope link
valid_lft forever preferred_lft forever
Any ideas why I get connection refused? It used to work, then I had to take it down while I tested a new switch.
I can ssh to the host, I can ping it from inside and outside.
I’m kind of lost 🙂
Hard to say without poking at it but I would start looking in /etc/apache2/apache2.conf, down near the bottom in the security section.
Is there a way to maybe tweak this to send it to a logging server perhaps? I think so. I’ll have to put this in my “Projects” folder.
So, my work, we have a ton of APC/Emerson UPS units. And the big issue is figuring out when the batteries go bad. If there was some sort of way to stick a pi on them and monitor them and send email alerts and syslog them…..that would be amazing
BIG THANKS!!!
I’m in Palm Beach Florida, virtually no hurricane damage here.
BUT, the ungraceful shutdown of my home lab was a big pain! A real fuster cluck. 😉
I now have motivation to setup UPS monitoring and shutdown scripts using a RPI Zero!
Any suggestions on doing this configuration with SNMP v3 for security and to have it readable by multiple devices/PCs?
Very helpful tutorial. Worked perfectly
You had mentioned at the bottom of your tutorial that you’d be posting the how to for the client side. Do you have the URL for that tutorial? I need to set those up as well.
Thanks.
YOu need to add to set the listening to allow remote connection from the Synology NAS in upds.conf?
LISTEN 0.0.0.0 3493
I know this is an old post, but I cannot get this to work any more. I had a config that used to work, but ceased at some point. It is an old install and is running:
“Raspbian GNU/Linux 11 (bullseye)”
I purged everything nut related and started over followed the recipe to the ‘t’ by copying and pasting (including the password of ‘secret’, for now). I keep getting ‘Connection refused’ from the UPS.
The usb shows the device connected:
pi@raspberrypi:~ $ lsusb
Bus 001 Device 004: ID 0764:0501 Cyber Power System, Inc. CP1500 AVR UPS
I get to here in the recipe:
pi@raspberrypi:~ $ sudo upsc servers@localhost
Error: Connection failure: Connection refused
nut-monitor is running but shows connection errors:
pi@raspberrypi:~ $ sudo systemctl status nut-monitor
● nut-monitor.service – Network UPS Tools – power device monitor and shutdown controller
Loaded: loaded (/lib/systemd/system/nut-monitor.service; enabled; vendor preset: enabled)
Active: active (running) since Thu 2024-07-18 09:35:29 CDT; 3s ago
Process: 7777 ExecStart=/sbin/upsmon (code=exited, status=0/SUCCESS)
Main PID: 7779 (upsmon)
Tasks: 3 (limit: 1595)
CPU: 26ms
CGroup: /system.slice/nut-monitor.service
├─7778 /lib/nut/upsmon
└─7779 /lib/nut/upsmon
Jul 18 09:35:29 raspberrypi upsmon[7778]: Startup successful
Jul 18 09:35:29 raspberrypi upsmon[7777]: fopen /run/nut/upsmon.pid: No such file or directory
Jul 18 09:35:29 raspberrypi upsmon[7777]: Using power down flag file /etc/killpower
Jul 18 09:35:29 raspberrypi upsmon[7777]: UPS: servers@localhost (master) (power value 1)
Jul 18 09:35:29 raspberrypi upsmon[7777]: /etc/nut/upsmon.conf line 383: invalid directive MAXAGE 25
Jul 18 09:35:29 raspberrypi systemd[1]: nut-monitor.service: Supervising process 7779 which is not our child. We’ll most likely not notice when it exits.
Jul 18 09:35:29 raspberrypi upsmon[7779]: Init SSL without certificate database
Jul 18 09:35:29 raspberrypi systemd[1]: Started Network UPS Tools – power device monitor and shutdown controller.
Jul 18 09:35:29 raspberrypi upsmon[7779]: UPS [servers@localhost]: connect failed: Connection failure: Connection refused
Jul 18 09:35:29 raspberrypi upsmon[7779]: Communications with UPS servers@localhost lost
I am running this on my ‘PiHole’ 3b+ and do not ‘think’ that the PiHole is impeding anything. I also use it as my wireguard server, so that goes through and it used to work on this Pi with with PiHole installed.
I can connect to the UPS using the windows based software from CyberPower, so it seems the cable and UPS are OK, just the Pi that cannot talk to it.
Cancel my latest comment. After that long poist, I rebooted and sure enough, I was able to connect to it. All works as expected.
Great post John! I used this with my PowerShield UPS purchased in Australia. The blazer_usb driver works with this UPS and has a helpful set of commands for this UPS too.
so i got the cgi site working, but its conflicting with port 80 with pihole… so now i cant get to my pihole config webpage. you might want to update with how to fix this for someone running pihole.
i figured out how to edit “/etc/apache2/ports.conf” and”/etc/apache2/sites-enabled/000-default.conf” to change from port 80 to 8080 so now its not conflicting with pihole