Nagios is a network monitoring system. It’s very useful for monitoring different types of equipment on your network, especially if different people need to be notified when certain things on the network fail. For example, if a router’s CPU goes way up for longer than you think is good, Nagios can send an email to the Network Team. Windows Server with a hard drive more than 90% full? eMail the Windows team! In either case, don’t bug the LINUX guys.
Yeah, yeah, at home, you want to get all the alerts. But maybe you only want to hear about the problem if it’s above 90% for more than 20 minutes. Nagios can handle that.
So, let’s get this running on a Raspberry Pi 4 and we can play. First, install the Apache web server and some utilities for compiling software. I’m just going to “sudo su -” and run all these commands right from /root:
apt install -y autoconf build-essential wget unzip apache2 apache2-utils php
apt install -y libgd-dev snmp libnet-snmp-perl gettext libssl-dev wget bc gawk dc libmcrypt-dev
Then, off to the Nagios GitHub Site to grab the latest free version:
wget https://github.com/NagiosEnterprises/nagioscore/archive/refs/heads/master.zip
Uncompress the distro and run configure to prep the software for compiling. Make all does the compilation. There’s a couple more “make” commands to facilitate the other configuration steps:
unzip master.zip
cd nagioscore-master/
./configure --with-httpd-conf=/etc/apache2/sites-enabled
make all
make install-groups-users
usermod -a -G nagios www-data
make install
make install-daemoninit
make install-config
make install-webconf
That’s it for now in configuring the Nagios stuff. Let’s take care of getting apache set up to run dynamic web content.
a2enmod rewrite
a2enmod cgi
Next, we’ll configure the main user’s webpassword:
htpasswd -c /usr/local/nagios/etc/htpasswd.users nagiosadmin
OK. Everything is set up. Run the systemctl commands to allow apache and nagios to start at boot time.
systemctl enable apache2
systemctl start apache2
systemctl enable nagios
systemctl start  nagios
OH! And, hey, while we’re sitting at the command prompt, still logged in as root, let’s go ahead and install the Nagios plug-ins. Plug-ins are the programs that Nagios uses to do its testing of your services. There’s a base set that we’ll install now. There are lots out in the community that we can gather for more specialized probing in the future.
wget https://github.com/nagios-plugins/nagios-plugins/releases/download/release-2.3.3/nagios-plugins-2.3.3.tar.gz
tar xvf nagios-plugins-2.3.3.tar.gz
cd nagios-plugins-2.3.3/
./configure
make
make install
systemctl restart nagios
The moment of truth! Use your browser to go to http://nagios/nagios/ or whatever your hostname is. My dns is not being helpful at the moment, so I’ll use the IP address instead of the hostname in the URL:
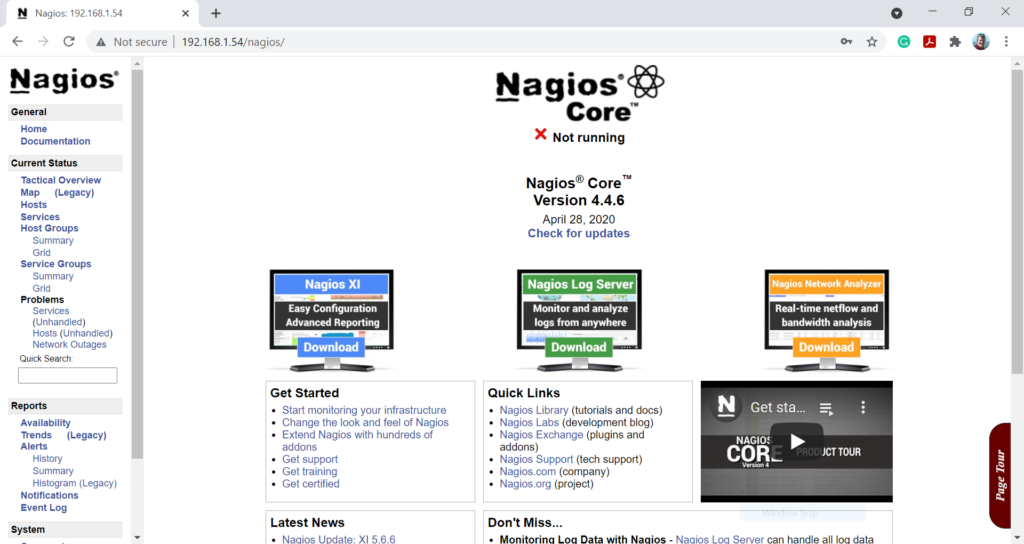
Yay! It runs! … or does it? WELL, apache is running and it’s finding static content, but that big red X in the middle of the screen is bothersome. Clicking on Hosts in the left menu gives us some clues:
Hmmm… I thought we built the config during installation with one of those make commands… OK. Troubleshooting step #1. Run “nagios -v” against the main config file. Here’s a screenful of that:
root@nagios:/usr/local/nagios/etc# /usr/local/nagios/bin/nagios -v nagios.cfg
 Nagios Core 4.4.6
 Copyright (c) 2009-present Nagios Core Development Team and Community Contributors
 Copyright (c) 1999-2009 Ethan Galstad
 Last Modified: 2020-04-28
 License: GPL
 Website: https://www.nagios.org
 Reading configuration data…
    Read main config file okay…
    Read object config files okay…
 Running pre-flight check on configuration data…
 Checking objects…
         Checked 8 services.
         Checked 1 hosts.
         Checked 1 host groups.
         Checked 0 service groups.
         Checked 1 contacts.
         Checked 1 contact groups.
         Checked 24 commands.
         Checked 5 time periods.
         Checked 0 host escalations.
         Checked 0 service escalations.
 Checking for circular paths…
         Checked 1 hosts
         Checked 0 service dependencies
         Checked 0 host dependencies
         Checked 5 timeperiods
 Checking global event handlers…
 Checking obsessive compulsive processor commands…
 Checking misc settings…
 Total Warnings: 0
 Total Errors:   0
 Things look okay - No serious problems were detected during the pre-flight check
 root@nagios:/usr/local/nagios/etc#
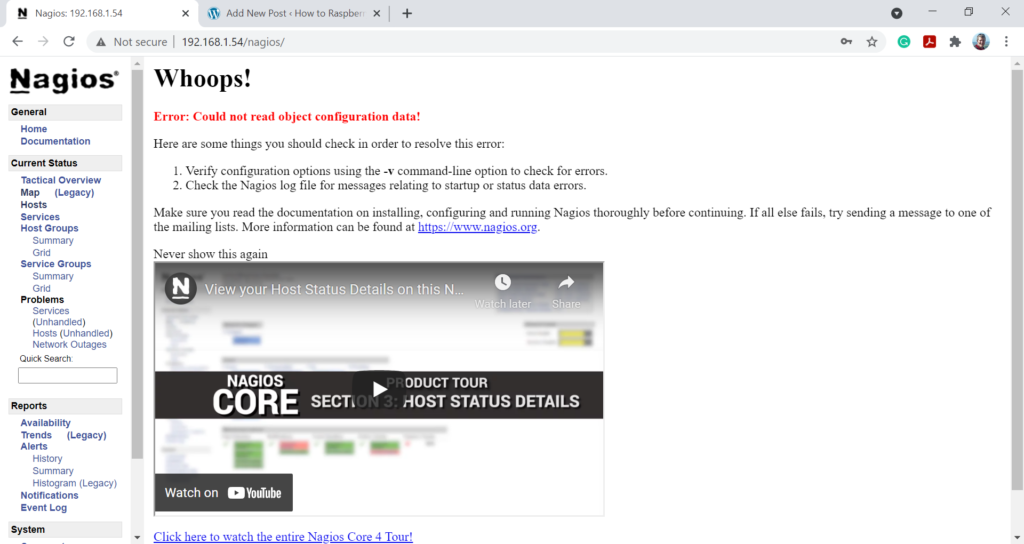
Ugh. Something else is wrong!! But, what? Let’s check the log:
root@nagios:/usr/local/nagios/var# cat nagios.log
 [1621970203] Nagios 4.4.6 starting… (PID=15769)
 [1621970203] Local time is Tue May 25 15:16:43 EDT 2021
 [1621970203] LOG VERSION: 2.0
 [1621970203] qh: Failed to init socket '/usr/local/nagios/var/rw/nagios.qh'. bind() failed: No such file or directory
 [1621970203] Error: Failed to initialize query handler. Aborting
Weird. So, I created the rw directory, chowned it to nagios:nagios, rebooted and browsed to my nagios server and I get: Daemon running with PID 571. Yay! NOW, it’s really running! Thank Goodness for logs!
Alright! Let’s click Hosts again and we get:

Hmmm. No joy, yet. Let’s paste that into Google.com. First hit looks like this:
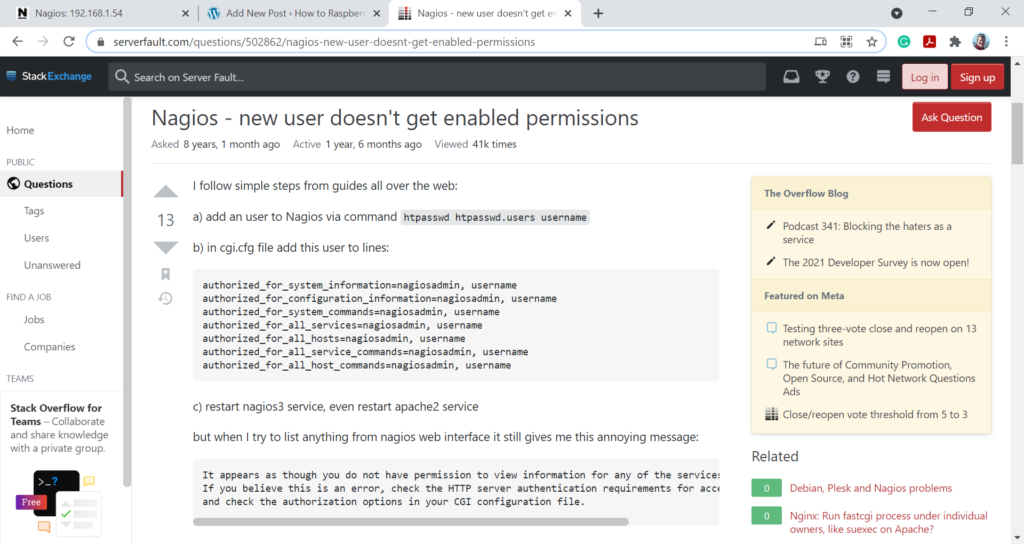
Oh, yeah. I might have changed the default user name from nagiosadmin to just nagios. So, following the above instructions, I’ll use sed to change all the lines from “nagiosadmin” to “nagiosadmin,nagios”, restart and try again!

YAY YAY YAY! NOW it’s all working! Now we have to configure all of our hosts! Now the real fun begins! Next post, how to configure Nagios!
Thx John, an excellent how-to which allowed a successful install on a Raspi 3B, even for a newbie like me. It works like a charm. ,)
That’s awesome! You should be fine on a RPi3. Nagios does a great job of spreading out the polling and not trying to do everything at once.
Installed this on a RPi2 and it work like a charm. Thank you very much for this well written tutorial. Loved the troubleshooting bit. Good stuff!
Hi John,
thanks for creating this excellent instruction. I installed it on a Raspberry Pi 2 Model B Rev 1.1 under Raspbian GNU/Linux 8 (jessie) and it is working fine.
Very cool! Love it when people realize that you don’t need to race out to buy the latest PI and this stuff will run on the old ones!
Great tutorial! I’ve been wanting to set up Nagios on my Raspberry Pi for monitoring my home network. The step-by-step instructions were clear and easy to follow. Thanks for sharing!
Great tutorial! I successfully installed Nagios on my Raspberry Pi using your step-by-step guide. The screenshots were particularly helpful. Thanks for sharing!