What is Mycroft? Mycroft is an open source voice assistant. Think Alexa without all the closed-source mystery. I like Mycroft because: 1) it’s open-source and 2) I can run it on a Raspberry Pi! It’s easy to set up and get running. It will need a dedicated PI with a microphone and a speaker. Let’s look at getting it running.
Installing mycroft on a Raspberry Pi 4
Download the mycroft image.
Burn the uncompressed .img file to a USB thumb drive with Balena Etcher or the Official Raspberry Imager. I use Raspberry Pi 4’s for all my new builds. I do have a couple of 3’s kicking around for my UPS monitor or my Octopi 3D printer interface, but by and large, all my new stuff is on a 4. The beautiful thing about a RPi 4 is that you can burn the image to a USB drive and boot from that without having to have a boot drive on an SD card and then dd the OS on a USB drive partition.
Once the imaging is complete, plug in the USB drive to the Raspberry Pi 4. Power the PI with a good 3.5 Amp supply like this one. I’ve also got a Logitech Speaker and a ReSpeaker 4-Mic Array on this Pi.
Once this arrangement boots up, you’ll see something named picroft join the network. ssh on over to picroft.local and login: (the password is mycroft)
ssh pi@picroft
pi@picroft's password:
 Linux picroft 5.4.51-v7l+ #1333 SMP Mon Aug 10 16:51:40 BST 2020 armv7l
 The programs included with the Debian GNU/Linux system are free software;
 the exact distribution terms for each program are described in the
 individual files in /usr/share/doc/*/copyright.
 Debian GNU/Linux comes with ABSOLUTELY NO WARRANTY, to the extent
 permitted by applicable law.
 Last login: Mon May 24 20:24:53 2021
 ███╗   ███╗██╗   ██╗ ██████╗██████╗  ██████╗ ███████╗████████╗
  ████╗ ████║╚██╗ ██╔╝██╔════╝██╔══██╗██╔═══██╗██╔════╝╚══██╔══╝
  ██╔████╔██║ ╚████╔╝ ██║     ██████╔╝██║   ██║█████╗     ██║
  ██║╚██╔╝██║  ╚██╔╝  ██║     ██╔══██╗██║   ██║██╔══╝     ██║
  ██║ ╚═╝ ██║   ██║   ╚██████╗██║  ██║╚██████╔╝██║        ██║
  ╚═╝     ╚═╝   ╚═╝    ╚═════╝╚═╝  ╚═╝ ╚═════╝ ╚═╝        ╚═╝
_____   _                            __   _      |  __ \  (_)                        / _| | |    | |__) |  _    ___   _ __    ___   | |_  | |_    |  ___/  | |  / __| | '__|  / _ \  |  _| | __|    | |      | | | (__  | |    | (_) | | |   | |_    |_|      |_|  \___| |_|     \___/  |_|    \__|

 ** Picroft enclosure platform version: Buster Keaton - Pork Pi
 **                       mycroft-core: 20.8.0 ( master )

 Welcome to Picroft.  This image is designed to make getting started with
 Mycroft quick and easy.  Would you like help setting up your system?
   Y)es, I'd like the guided setup.
   N)ope, just get me a command line and get out of my way!
 Choice [Y/N]:

Just answer "n" and let the installation complete.  We have to install the microphone drivers anyways.
Installing the ReSpeaker
git clone https://github.com/respeaker/seeed-voicecard.git
cd seeed-voicecard/
sudo ./install.sh
For me, this ended badly. It ran for 20 or so minutes, and then barfed a bunch of compile errors. I ended up using the alternate install command:
sudo ./install.sh --compat-kernel

This ran for a while as well, terminating in this:
Start service seeed-voicecard
 see /var/log/seeed-voicecard.log for more service information
 Created symlink /etc/systemd/system/sysinit.target.wants/seeed-voicecard.service → /lib/systemd/system/seeed-voicecard.service.
 Please reboot your device to apply all settings
 Enjoy!
Turns out, Respeaker hasn’t updated their stuff lately and you have to tell the compile to an older kernel. No biggie! I’m happy I didn’t have to do this all by hand. I’m a huge fan of automated installs! Reboot your Pi!
Mycroft.AI
Of course, there’s a whole ‘nother website behind this. Head on over to https://home.mycroft.ai/dashboard and create an account for yourself. The Raspberry Pi installation relies on an account on this website to figure out what you’re saying.
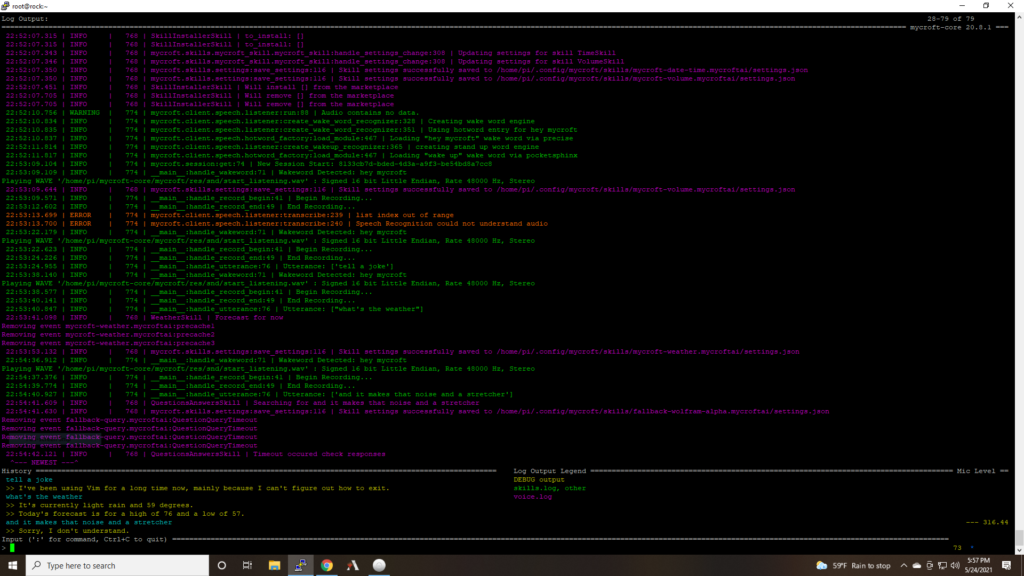
So head on over to https://account.mycroft.ai/devices/add and type in the registration code that mycroft keeps chanting. Once you register with mycroft.ia, your personal assistant should start working! The nice thing about mycorft is that it’s pretty transparent with what it’s doing. Here’s the screen that I see while taking to Mycroft:
Next, I want to figure out how to get mycroft integrated with openHAB and I can use it to turn off my HUE lights with just my voice!